- Local.Repair
- Blog
- How to Repair a Cracked Wall: Tips and Tricks
How to Repair a Cracked Wall: Tips and Tricks

Cracks in your wall can be unsightly and, if left unattended, can lead to more serious structural issues. However, repairing a cracked wall can be a simple DIY task if you follow the right steps. In this article, we will guide you through the process of repairing a cracked wall using some tips and tricks to ensure a long-lasting and professional-looking finish.
Identifying the Type of Wall Crack
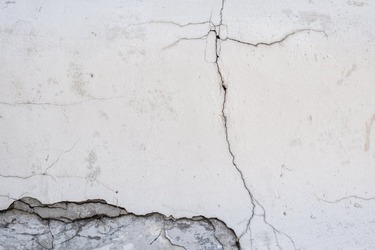
The first step in repairing a cracked wall is to identify the type of crack you are dealing with. There are different types of wall cracks, including hairline cracks, vertical cracks, horizontal cracks, and diagonal cracks. Hairline cracks are usually superficial and can be easily repaired, while vertical, horizontal, and diagonal cracks may indicate more serious structural issues that require professional intervention.
Tools and Materials Needed for Repair
To repair a cracked wall, you will need a few basic tools and materials. These include a putty knife, sandpaper, patching compound, primer, paint or wallpaper, and a paintbrush or roller. Make sure to choose a patching compound that is suitable for the type of crack you are dealing with and matches the texture of your wall for a seamless finish.
Preparing the Cracked Wall Surface
Before you start filling the crack, it is essential to prepare the cracked wall surface properly. Use a putty knife to remove any loose debris or old patching compound from the crack. Clean the area with a damp cloth to ensure the patching compound adheres properly to the wall. If the crack is wider than a hairline crack, you may need to widen it slightly with a putty knife to create a smooth surface for patching.
Filling the Crack with Patching Compound
Once the cracked wall surface is prepared, it is time to fill the crack with patching compound. Apply a generous amount of patching compound to the crack using a putty knife, making sure to fill the entire crack and create a smooth and even surface. Smooth out the surface of the patching compound with the putty knife to blend it seamlessly with the surrounding wall.
Smoothing Out the Patching Compound
After filling the crack with patching compound, use a damp sponge or a putty knife to smooth out the patching compound and remove any excess material. Make sure to feather the edges of the patching compound to blend it with the surrounding wall for a professional-looking finish. Allow the patching compound to dry according to the manufacturer's instructions before moving on to the next step.
Sanding and Priming the Patched Area
Once the patching compound is completely dry, lightly sand the patched area with fine-grit sandpaper to smooth out any rough edges and create a seamless finish. Wipe away any dust with a damp cloth before applying a coat of primer to the patched area. The primer will help the paint or wallpaper adhere to the patching compound and ensure a uniform finish.
Applying Paint or Wallpaper to Finish
After the primer has dried, you can apply paint or wallpaper to finish the repair. Choose a paint color or wallpaper design that matches the rest of the wall to create a cohesive look. Use a paintbrush or roller to apply an even coat of paint or wallpaper to the patched area, making sure to blend it with the surrounding wall for a flawless finish.
Monitoring for Future Cracks
After repairing a cracked wall, it is important to monitor the patched area for any signs of future cracks. Keep an eye on the repaired area for any new cracks or changes in the wall's structure, as this may indicate underlying issues that need to be addressed. Regular maintenance and inspections can help prevent future wall cracks and ensure the longevity of your wall's structure.
Preventative Measures for Wall Cracks
To prevent wall cracks in the future, make sure to address any underlying issues that may be causing the cracks, such as foundation settling or moisture problems. Properly maintain your home's foundation and address any water leaks or drainage issues promptly to prevent cracks from forming. Additionally, avoid hanging heavy objects on your walls and invest in high-quality paint or wallpaper to protect your walls from wear and tear.
When to Seek Professional Help
If you are dealing with severe wall cracks, such as wide or growing cracks, cracks accompanied by other structural issues, or cracks that keep reappearing despite repairs, it may be time to seek professional help. A professional contractor or structural engineer can assess the severity of the cracks and recommend the best course of action to address the underlying issues and prevent further damage to your wall.
===
Repairing a cracked wall can be a straightforward task with the right tools, materials, and techniques. By following the tips and tricks outlined in this article, you can repair a cracked wall effectively and prevent future issues. Remember to identify the type of crack you are dealing with, prepare the cracked wall surface properly, fill the crack with patching compound, and finish with paint or wallpaper for a professional result. Keep an eye on the patched area for any signs of future cracks and take preventative measures to ensure the longevity of your walls. If in doubt, don't hesitate to seek professional help to address any severe wall cracks and underlying structural issues.


